Previous
Configure your frame system
If you have a gripper, camera, or other components attached to your arm, you can configure them to move with the arm.
You can also take into account passive objects attached to the arm such as a camera mount to avoid collisions.
If you have a gripper, you can configure it to move with the arm. If you haven’t already configured your gripper, see [Configure a gripper].
Configure the gripper’s frame to describe its position and orientation relative to the arm:
In the CONFIGURE tab, find the gripper’s configuration card.
Click + Add frame.
Select the arm’s frame as the parent frame.
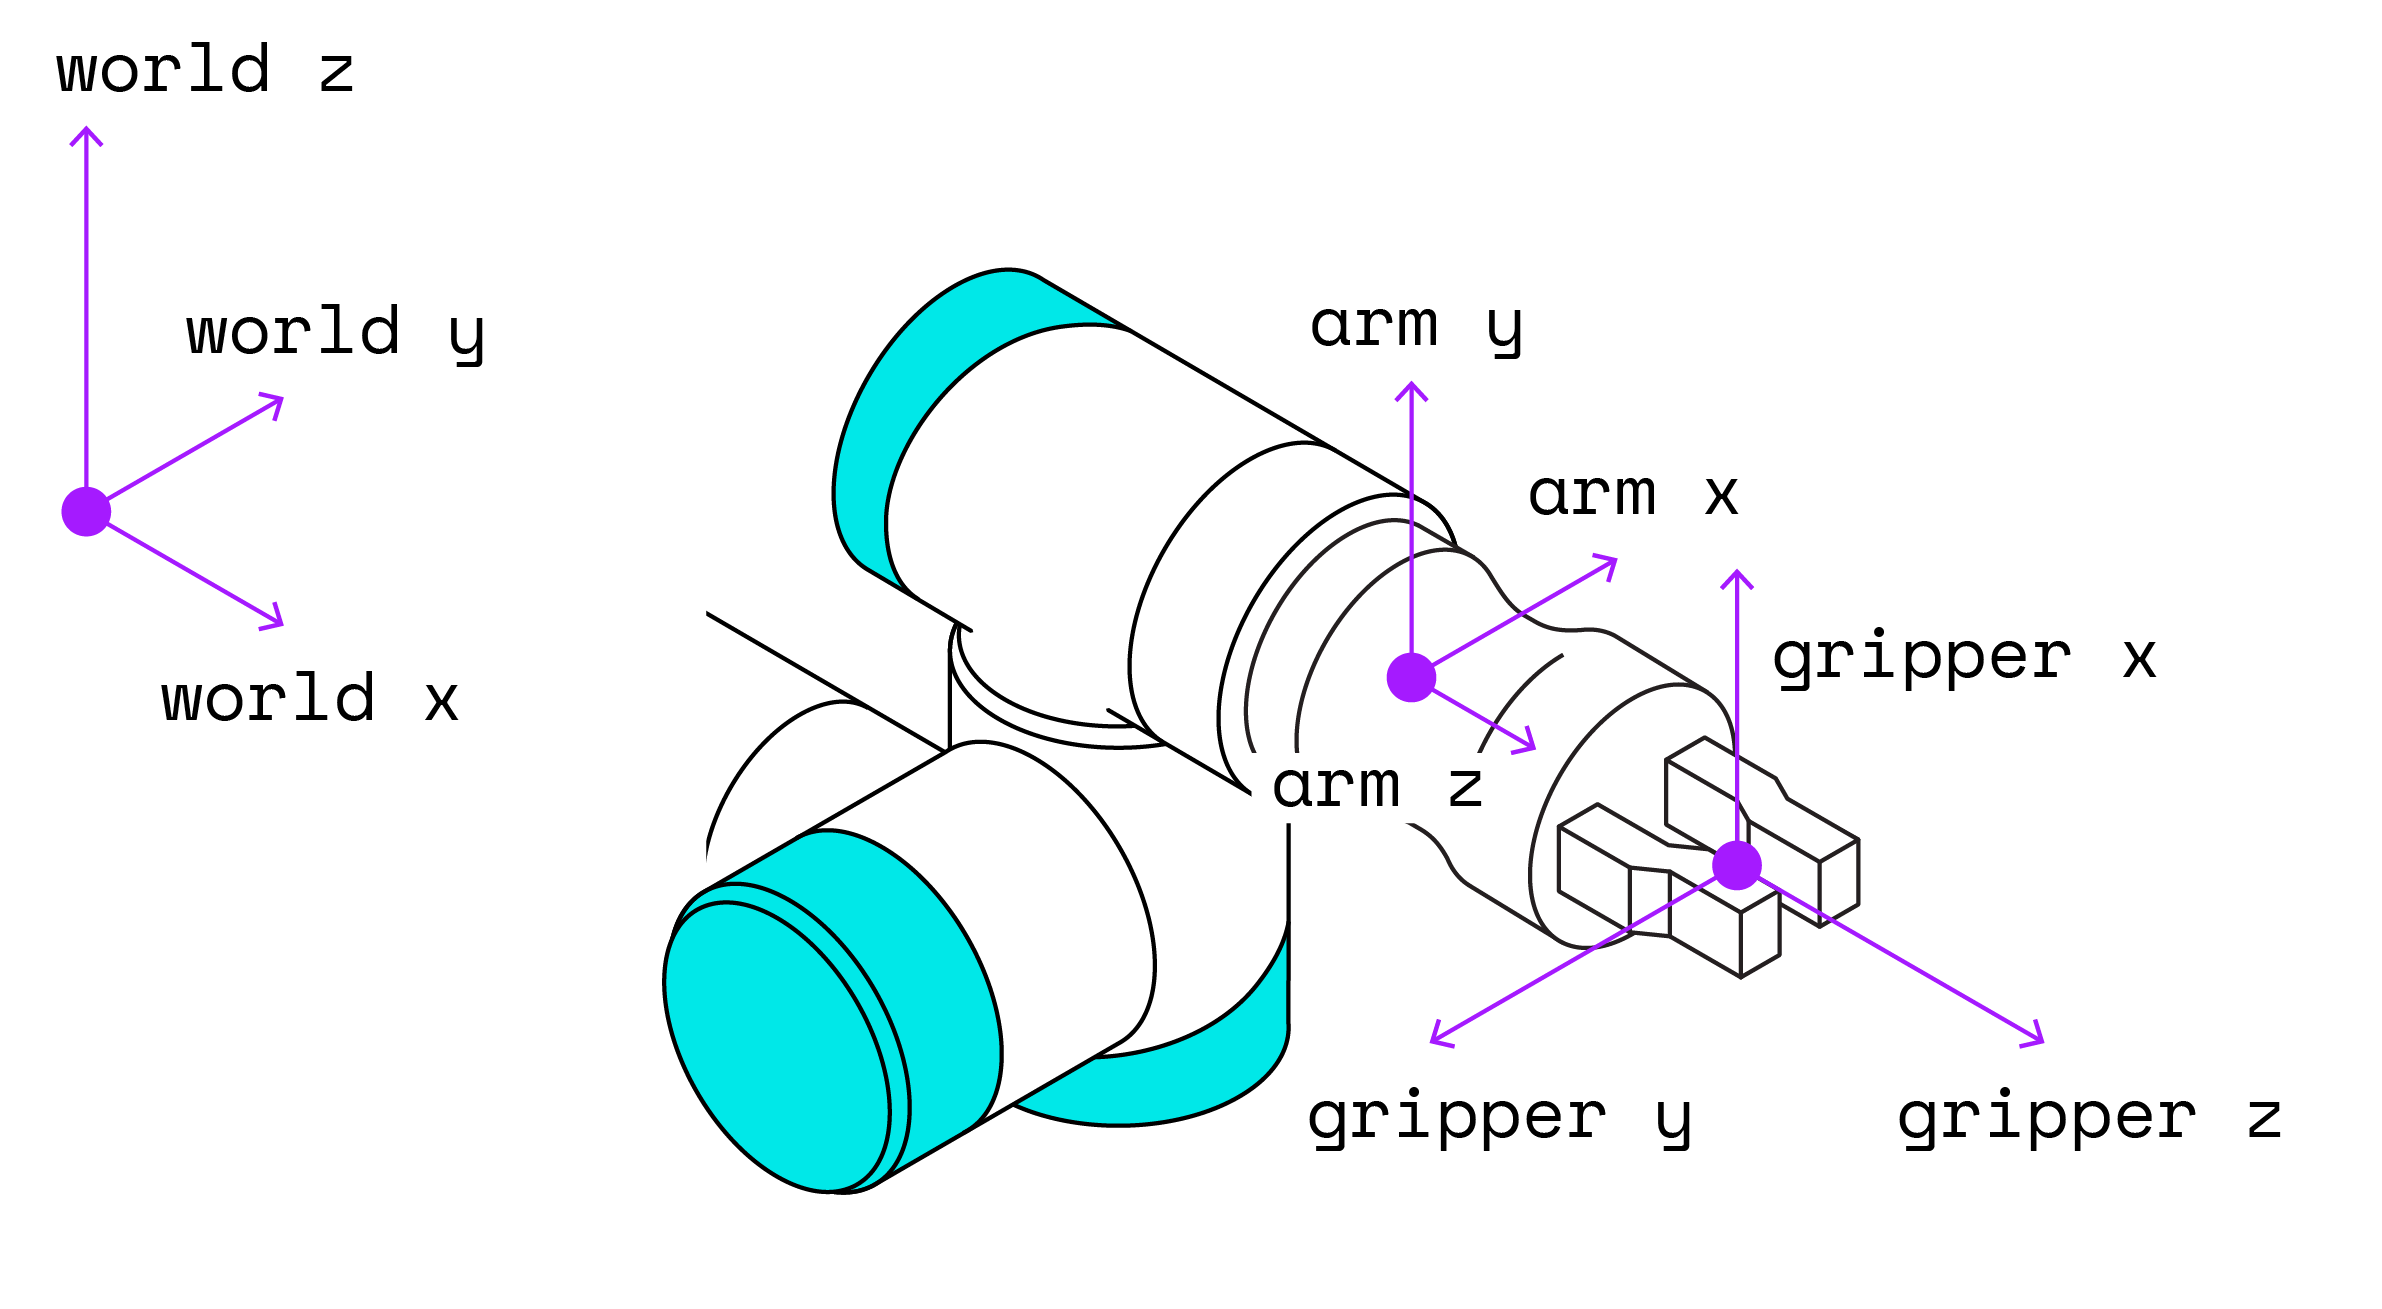
Enter the gripper frame’s position and orientation relative to the center of the end of the arm. It is up to you to decide what part of the gripper you want to use as the gripper frame. It is generally convenient to use a point near the center of the gripper jaws as the gripper frame.
When you make a call to the motion service to move the gripper to a location, the point you specify in this step is the part of the gripper that will move to that location.

The gripper in the image above has a translation of 110 millimeters in the z-direction, and it is oriented along the same z-axis as the end of the arm but is rotated 90 degrees around the z-axis, so its frame configuration is:
{
  "orientation": {
    "type": "ov_degrees",
    "value": {
      "th": 90,
      "x": 0,
      "y": 0,
      "z": 1
    }
  },
  "parent": "my-arm",
  "translation": {
    "x": 0,
    "y": 0,
    "z": 110
  }
}
Check whether your gripper has a kinematics file.
Some grippers have kinematics files that describe the position and orientation of the jaws of the gripper as they move, relative to the gripper’s base.
This file typically also contains geometries that represent the gripper’s volume to avoid collisions between the gripper and its environment.
You can check whether your gripper has a kinematics file by looking in its module source code, or by using the GetKinematics method.
If you have a kinematics file, you do not need to add any geometries to the gripper’s frame, assuming the gripper appears as expected in the VISUALIZE tab.
If you do not have a kinematics file, see Configure the geometry of the object to configure a geometry for the gripper to avoid collisions between the gripper and its environment.
If you have a camera that can see the environment, configure the camera’s frame to describe its position and orientation relative to the arm so that what the camera sees can be used to plan the arm’s motion:
Configure the camera itself.
For example, you can use an Intel Realsense camera by configuring the realsense model of the camera component according to its documentation.
In the CONFIGURE tab, find the camera’s configuration card.
Click + Add frame.
Edit the frame depending on where the camera is mounted:
Set the arm’s frame as the parent frame.
Enter the camera lens’ position and orientation relative to the center of the end of the arm.
Leave the world frame as the parent frame.
Enter the camera lens’ position and orientation relative to the world frame.
If you have a passive object attached to the arm such as a camera mount, you will want the motion service to be aware of it to avoid collisions.
Move motion service API method.
This is covered in the move an arm guide.In the CONFIGURE tab, click the + button > Component or service > generic.
Select fake component (do not select service; services do not have geometries).
Enter a name and click Create.
Click + Add frame.
Set the parent frame to the name of the arm or gripper, depending on where the object is attached.
Copy the following geometry template into the frame configuration, depending on your object’s shape:
A rectangular prism with dimensions x, y, and z in millimeters.
  "geometry": {
    "type": "box",
    "x": 80,
    "y": 250,
    "z": 200
  }
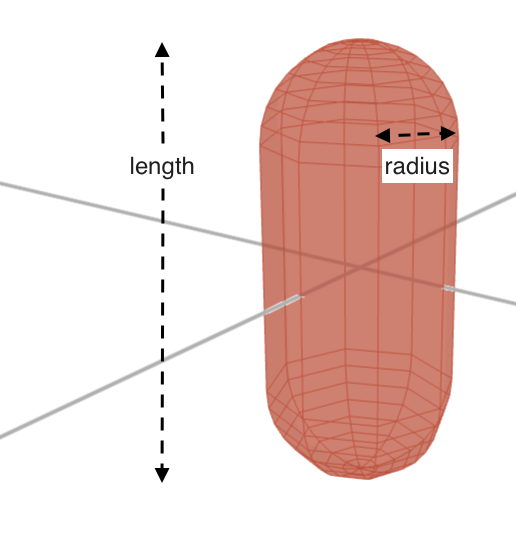
A cylinder with hemispherical end caps.
r is the radius of the cylinder, and l is the overall length of the cylinder in millimeters.
  "geometry": {
    "type": "capsule",
    "r": 20,
    "l": 160
  }

A sphere with radius r in millimeters.
  "geometry": {
    "type": "sphere",
    "r": 90
  }
Edit the dimensions to match your object’s dimensions.
The origin of the geometry is at its center.
Set the translation of the object’s origin relative to its parent frame.
For example, if you have a capsule of length 160 and you want it to begin at the origin of the parent frame, set the translation to "z"=80.
Click Save.
Check that the object appears as expected in the VISUALIZE tab.
If you need to change the object’s orientation, you can make changes to the orientation, save the config, and return to the VISUALIZE tab to see the changes. It can be helpful to understand the following:
The z-axis of a box is along its z-dimension and so forth with the x and y axes. If your box is at a right angle to how you want it to be oriented, try changing the dimensions to match the correct directions.
If you need to rotate the box about its z-axis, edit theta (th) to the desired angle and check the VISUALIZE tab to see the changes.
To point the box’s z-axis in a different direction, for example at a 30 degree angle from the parent frame’s x-axis in the x-y plane, you can change its orientation to:
  "orientation": {
    "type": "ov_degrees",
    "value": {
      "th": 0,
      "x": 0.866,
      "y": 0.5,
      "z": 0
    }
  }
Go to the VISUALIZE tab to see the changes.
The z-axis of a capsule is along its length.
If, for example, you need the length of the capsule to be along the x-axis, you can change its orientation to:
  "orientation": {
    "type": "ov_degrees",
    "value": {
      "th": 0,
      "x": 1,
      "y": 0,
      "z": 0
    }
  }
Go to the VISUALIZE tab to see that the z-axis of the capsule is now aligned with the parent frame’s x-axis, 90 degrees from its original orientation.
If you need the capsule to be aligned at a 45 degree angle between y and z, you can change its orientation to:
  "orientation": {
    "type": "ov_degrees",
    "value": {
      "th": 0,
      "x": 0,
      "y": 1,
      "z": 1
    }
  }
You should not need to modify theta (th) for capsules since that would spin the round capsule around its axis, causing no meaningful change.
A sphere’s orientation generally does not need to be changed.
Was this page helpful?
Glad to hear it! If you have any other feedback please let us know:
We're sorry about that. To help us improve, please tell us what we can do better:
Thank you!